Windows Phone 7 LongListSelector Sample with Accents and Culture support

Recently I’ve made a few posts about how to support different cultures and accents when using the Windows Phone 7 Long List Selector from the Windows Phone Toolkit. So rather than try and explain each bit I decided to finally publish the code showing how the MSDN sample can be altered to support both accented groupings and cultures;

https://wp7llssample.codeplex.com/

The sample is provided as-is, the code is mostly from MSDN with a few tweaks. You should not accept this as production ready code, please carry out your own tests.

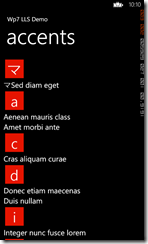
Accented grouping

Capture

Japanese grouping

JapaneseGrouping

Japanese Jump List

JapaneseJumpList

Windows Phone Jump List groupings

In a recent post about displaying a longlistselector in wp7 I eluded to code that would need to be correctly localised. Whilst I haven’t had the time to produce the code, I thought this may prove useful in the meantime (Note: the cultures are from wp8 and may change in future releases);
(Edit) – made it a bit easier to consume, shows phonetic support and corrected issue with the a poor cut that chopped the last character

{“sq-AL”,”#abcdefghijklmnopqrstuvwxyz…”}, \\ SupportsPhonetics False
{“ar-SA”,”ابتثجحخدذرزسشصضطظعغفقكلمنهوي…#abcdefghijklmnopqrstuvwxyz”}, \\ SupportsPhonetics False
{“Az-Latn-AZ”,”#abcdefghijklmnopqrstuvwxyz…”}, \\ SupportsPhonetics False
{“be-BY”,”абвгѓґдђеёєжзѕиїјкќлљмнњопрстћуўфхцччџшщъыьэюя…#abcdefghijklmnopqrstuvwxyz”}, \\ SupportsPhonetics False
{“bg-BG”,”абвгѓґдђеёєжзѕиїјкќлљмнњопрстћуўфхцччџшщъыьэюя…#abcdefghijklmnopqrstuvwxyz”}, \\ SupportsPhonetics False
{“ca-ES”,”#abcdefghijklmnopqrstuvwxyz…”}, \\ SupportsPhonetics False
{“zh-CN”,”#ABCDEFGHIJKLMNOPQRSTUVWXYZ…”}, \\ SupportsPhonetics False
{“zh-TW”,”ㄅㄆㄇㄈㄉㄊㄋㄌㄍㄎㄏㄐㄑㄒㄓㄔㄕㄖㄗㄘㄙㄚㄛㄜㄝㄞㄟㄠㄡㄢㄣㄤㄥㄦㄧㄨㄩ…#abcdefghijklmnopqrstuvwxyz”}, \\ SupportsPhonetics False
{“hr-HR”,”#abcdefghijklmnopqrstuvwxyz…”}, \\ SupportsPhonetics False
{“cs-CZ”,”#abcdefghijklmnopqrstuvwxyz…”}, \\ SupportsPhonetics False
{“da-DK”,”#abcdefghijklmnopqrstuvwxyzæøå…”}, \\ SupportsPhonetics False
{“nl-NL”,”#abcdefghijklmnopqrstuvwxyz…”}, \\ SupportsPhonetics False
{“en-US”,”#abcdefghijklmnopqrstuvwxyz…”}, \\ SupportsPhonetics False
{“en-GB”,”#abcdefghijklmnopqrstuvwxyz…”}, \\ SupportsPhonetics False
{“et-EE”,”#abcdefghijklmnopqrsšzžtuvwõäöũxy…”}, \\ SupportsPhonetics False
{“fil-PH”,”#abcdefghijklmnopqrstuvwxyz…”}, \\ SupportsPhonetics False
{“fi-FI”,”#abcdefghijklmnopqrstuvwxyzåäö…”}, \\ SupportsPhonetics False
{“fr-FR”,”#abcdefghijklmnopqrstuvwxyz…”}, \\ SupportsPhonetics False
{“de-DE”,”#abcdefghijklmnopqrstuvwxyz…”}, \\ SupportsPhonetics False
{“el-GR”,”αβγδεζηθικλμνξοπρστυφχψω…#abcdefghijklmnopqrstuvwxyz”}, \\ SupportsPhonetics False
{“he-IL”,”אבגדהוזחטיכלמנסעפצקרשת…#abcdefghijklmnopqrstuvwxyz”}, \\ SupportsPhonetics False
{“hi-IN”,”अआइईउऊऋएऐऑओऔकखगघचछजझटठडढणतथदधनपफबभमयरलवशषसह…#abcdefghijklmnopqrstuvwxyz”}, \\ SupportsPhonetics False
{“hu-HU”,”#abcdefghijklmnopqrstuvwxyz…”}, \\ SupportsPhonetics False
{“id-ID”,”#abcdefghijklmnopqrstuvwxyz…”}, \\ SupportsPhonetics False
{“it-IT”,”#abcdefghijklmnopqrstuvwxyz…”}, \\ SupportsPhonetics False
{“ja-JP”,”アカサタナハマヤラワ…#abcdefghijklmnopqrstuvwxyz”}, \\ SupportsPhonetics True
{“kk-KZ”,”абвгѓґдђеёєжзѕиїјкќлљмнњопрстћуўфхцччџшщъыьэюя…#abcdefghijklmnopqrstuvwxyz”}, \\ SupportsPhonetics False
{“ko-KR”,”ㄱㄴㄷㄹㅁㅂㅅㅇㅈㅊㅋㅌㅍㅎ#abcdefghijklmnopqrstuvwxyz…”}, \\ SupportsPhonetics False
{“lv-LV”,”#abcdefghijklmnopqrstuvwxyz…”}, \\ SupportsPhonetics False
{“lt-LT”,”#abcdefghijklmnopqrstuvwxyz…”}, \\ SupportsPhonetics False
{“mk-MK”,”абвгѓґдђеёєжзѕиїјкќлљмнњопрстћуўфхцччџшщъыьэюя…#abcdefghijklmnopqrstuvwxyz”}, \\ SupportsPhonetics False
{“ms-MY”,”#abcdefghijklmnopqrstuvwxyz…”}, \\ SupportsPhonetics False
{“nb-NO”,”#abcdefghijklmnopqrstuvwxyzæøå…”}, \\ SupportsPhonetics False
{“fa-IR”,”ابپتثجچحخدذرزژسشصضطظعغفقکگلمنوهی…#abcdefghijklmnopqrstuvwxyz”}, \\ SupportsPhonetics False
{“pl-PL”,”#abcdefghijklmnopqrstuvwxyz…”}, \\ SupportsPhonetics False
{“pt-BR”,”#abcdefghijklmnopqrstuvwxyz…”}, \\ SupportsPhonetics False
{“pt-PT”,”#abcdefghijklmnopqrstuvwxyz…”}, \\ SupportsPhonetics False
{“ro-RO”,”#abcdefghijklmnopqrstuvwxyz…”}, \\ SupportsPhonetics False
{“ru-RU”,”абвгдеёжзийклмнопрстуфхцчшщъыьэюя…#abcdefghijklmnopqrstuvwxyz”}, \\ SupportsPhonetics False
{“sr-Latn-CS”,”#abcdefghijklmnopqrstuvwxyz…”}, \\ SupportsPhonetics False
{“sk-SK”,”#abcdefghijklmnopqrstuvwxyz…”}, \\ SupportsPhonetics False
{“es-ES”,”#abcdefghijklmnopqrstuvwxyz…”}, \\ SupportsPhonetics False
{“es-MX”,”#abcdefghijklmnopqrstuvwxyz…”}, \\ SupportsPhonetics False
{“sv-SE”,”#abcdefghijklmnopqrstuvwxyzåäö…”}, \\ SupportsPhonetics False
{“th-TH”,”กขฃคฅฆงจฉชซฌญฎฏฐฑฒณดตถทธนบปผฝพฟภมยรลวศษสหฬอฮ…#abcdefghijklmnopqrstuvwxyz”}, \\ SupportsPhonetics False
{“tr-TR”,”#abcçdefgğhıijklmnoöprsştuüvyz…”}, \\ SupportsPhonetics False
{“uk-UA”,”абвгѓґдђеёєжзѕиїјкќлљмнњопрстћуўфхцччџшщъыьэюя…#abcdefghijklmnopqrstuvwxyz”}, \\ SupportsPhonetics False
{“uz-Latn-UZ”,”#abcdefghijklmnopqrstuvwxyz…”}, \\ SupportsPhonetics False
{“vi-VN”,”#abcdefghijklmnopqrstuvwxyz…”}, \\ SupportsPhonetics False

How to use wp7 LongListSelector with Blend Sample Data

In my previous post, How to use Blend sample data with a LongListSelector, I described a a step by step approach to allow Blend sample data to be used with the Wp8 LongListSelector. It makes development a lot easier. However, recently I’ve seen people struggling with the Windows Phone 7 toolikit version and so I thought I’d create this little amendment to support wp7.

  1. Follow the wp8 guide from the link above, it won’t compile but don’t worry we’ll correct it
  2. Replace the magic alpha key class with the following (it has some room for improvement, I’ll get to that later);
     
    
    using System.Collections.Generic;
    using System.Globalization;
    
    namespace LLSSample
    {
        public class AlphaKeyGroup<T> : List<T>
        {
            static string SortedLocalGrouping = "#abcdefghijklmnopqrstuvwxyz";
            /// <summary>
            /// The delegate that is used to get the key information.
            /// </summary>
            /// <param name="item">An object of type T</param>
            /// <returns>The key value to use for this object</returns>
            public delegate string GetKeyDelegate(T item);
    
            /// <summary>
            /// The Key of this group.
            /// </summary>
            public string Key { get;  set; }
    
            
            /// <summary>
            /// Public constructor.
            /// </summary>
            /// <param name="key">The key for this group.</param>
            public AlphaKeyGroup(string key)
            {
                Key = key;
            }
    
            public override string ToString()
            {
                return Key;
            }
            /// <summary>
            /// Create a list of AlphaGroup<T> with keys set by a SortedLocaleGrouping.
            /// </summary>
            /// <param name="slg">The </param>
            /// <returns>Theitems source for a LongListSelector</returns>
            private static List<AlphaKeyGroup<T>> CreateGroups(string nameList)
            {
                List<AlphaKeyGroup<T>> list = new List<AlphaKeyGroup<T>>();
    
                foreach (char key in nameList.ToCharArray() )
                {
                    list.Add(new AlphaKeyGroup<T>((key.ToString())));
                }
    
                return list;
            }
    
            /// <summary>
            /// Create a list of AlphaGroup<T> with keys set by a SortedLocaleGrouping.
            /// </summary>
            /// <param name="items">The items to place in the groups.</param>
            /// <param name="ci">The CultureInfo to group and sort by.</param>
            /// <param name="getKey">A delegate to get the key from an item.</param>
            /// <param name="sort">Will sort the data if true.</param>
            /// <returns>An items source for a LongListSelector</returns>
            public static List<AlphaKeyGroup<T>> CreateGroups(IEnumerable<T> items, CultureInfo ci, GetKeyDelegate getKey, bool sort)
            {
    
                List<AlphaKeyGroup<T>> list = CreateGroups(SortedLocalGrouping);
    
                foreach (T item in items)
                {
                    int index = 0;
                    
                    {
                        string label = getKey(item);
                        index = SortedLocalGrouping.IndexOf(label[0].ToString().ToLower());
                    }
                    if (index >= 0 && index < list.Count)
                    {
                        list[index].Add(item);
                    }
                }
    
                if (sort)
                {
                    foreach (AlphaKeyGroup<T> group in list)
                    {
                        group.Sort((c0, c1) => { return ci.CompareInfo.Compare(getKey(c0), getKey(c1)); });
                    }
                }
    
                return list;
            }
    
        }
    }
    
  3. That’s enough, you can carry on following your favourite wp7 LLS tutorial. However, I’ve included the XAML from my sample too;
     
        <phone:PhoneApplicationPage.Resources>
            <DataTemplate x:Key="AddrBookItemTemplate">
                <StackPanel VerticalAlignment="Top">
                    <TextBlock FontWeight="Bold"  Text="{Binding FirstName}" />
                    <TextBlock Text="{Binding LastName}" />
                    <TextBlock Text="{Binding Address}" />
                    <TextBlock Text="{Binding Phone}" />
                </StackPanel>
            </DataTemplate>
            <DataTemplate x:Key="AddrBookGroupHeaderTemplate">
                <Border Background="Transparent" Padding="5">
                    <Border Background="{StaticResource PhoneAccentBrush}" BorderBrush="{StaticResource PhoneAccentBrush}" BorderThickness="2" Width="62" 
             Height="62" Margin="0,0,18,0" HorizontalAlignment="Left">
                        <TextBlock Text="{Binding Key}" Foreground="{StaticResource PhoneForegroundBrush}" FontSize="48" Padding="6" 
                FontFamily="{StaticResource PhoneFontFamilySemiLight}" HorizontalAlignment="Left" VerticalAlignment="Center"/>
                    </Border>
                </Border>
            </DataTemplate>
            <DataTemplate x:Key="GroupItemsTemplateWp7">
                <Border Background="{StaticResource PhoneAccentBrush}" Margin="{StaticResource PhoneTouchTargetOverhang}" Padding="{StaticResource PhoneTouchTargetOverhang}">
                    <TextBlock Text="{Binding Key}" Style="{StaticResource PhoneTextLargeStyle}"/>
                </Border>
            </DataTemplate>
            <ItemsPanelTemplate x:Key="GroupItemsPanelTemplate">
                        <toolkit:WrapPanel Orientation="Horizontal"/>   
            </ItemsPanelTemplate>
        </phone:PhoneApplicationPage.Resources>
    
     
    <toolkit:LongListSelector
                      x:Name="AddrBook"
                      IsFlatList="False"
                      DisplayAllGroups="True"
                      DataContext="{Binding Source={StaticResource LongListSelectorData}}"
                      ItemsSource="{Binding DataSource}"
                      Background="Transparent"
                      GroupHeaderTemplate="{StaticResource AddrBookGroupHeaderTemplate}"
                      ItemTemplate="{StaticResource AddrBookItemTemplate}" GroupItemTemplate="{StaticResource GroupItemsTemplateWp7}" GroupItemsPanel="{StaticResource GroupItemsPanelTemplate}"
                      />
    
    
  4. Enjoy design time editing in wp7 too 🙂

Ah, about the differences. The original alpha key class uses some nice localisation tricks that provides the jump list and group headers to be correctly grouped depending upon the users culture. This version is stuck with a hard-coded English character set. I’ve left the skeleton of the code the same as the wp8 version so you can implement your own localisation routines. If I have time I’ll publish that a later date. Hopefully there should be enough there to help you get on.

Easy theming with Windows Phone

Easy theming with Windows Phone

Windows Phone has the concept of Dark and Light themes. I really like this idea as I typically have my phone in Dark theme and switch to Light when in bright sunshine. Unfortunately not a lot of applications make use of these themes so I wanted to share the method I use to implement it.

The basics

The idea is to provide your designer, or at least the one within, with a nice clean separation of Light and Dark styles.

clip_image001

Figure 1 Basic file structure

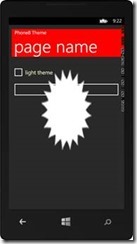
Here we can see the three main components; Dark.xaml, Light.xaml and Master.xaml. Let’s first look at the output so you can see the type of changes you can make. Obviously I’m being garish to exaggerate the difference, and normally I’d be more subtle 🙂 />

clip_image003clip_image005

As you can see the explosion is white in the Dark theme and yellow in Light. Also the background brush in the header is red and sky blue for Dark and Light respectively. Essentially any style is available to change. So what have I changed to create this lovely theme sensitive UI?

Example Theme Xaml

Dark;

<ResourceDictionary
xmlns="http://schemas.microsoft.com/winfx/2006/xaml/presentation"
xmlns:x="http://schemas.microsoft.com/winfx/2006/xaml">
<SolidColorBrush x:Key="AppBackgroundBrush" Color="Red"/>
<SolidColorBrush x:Key="AppForegroundBrush" Color="#FFFBFFC9"/>
<Color x:Key="PhoneForegroundColor">#FF6E1919</Color>
<SolidColorBrush x:Key="PhoneForegroundBrush" Color="{StaticResource PhoneForegroundColor}"/>
<ImageBrush x:Key="ImageBrushBackground" ImageSource="/Background.png"/>
</ResourceDictionary>  

Light;

<ResourceDictionary
xmlns="http://schemas.microsoft.com/winfx/2006/xaml/presentation"
xmlns:x="http://schemas.microsoft.com/winfx/2006/xaml">
<SolidColorBrush x:Key="AppBackgroundBrush" Color="SkyBlue"/>
<SolidColorBrush x:Key="AppForegroundBrush" Color="#FF303026"/>
<Color x:Key="PhoneForegroundColor">#FFF5F908</Color>
<SolidColorBrush x:Key="PhoneForegroundBrush" Color="{StaticResource PhoneForegroundColor}"/>
<ImageBrush x:Key="ImageBrushBackground" ImageSource="/BackgroundLight.png"/>
</ResourceDictionary> 

The idea is that you use the same resource keys and change the underlying value to suite the theme. For example, we can see that the ImageSource for ImageBrushBackground is different for each theme.

How do you use the Theme files?

I owe the technique to a great post from IdentityMine, essentially you derive a new static resource type which loads the correct themed xaml *before* your page has started to load. I’ve wrapped this type in a separate component you can just reference and use. Rather than regurgitate the Identity Mine post I’ll explain how to use it, NB or you can just use the sample;

1. Create the Dark and Light xaml files as shown in Figure 1 Basic file structure

2. Add a reference to Pauliom.Theming.dll (or Pauliom.Phone8.Theming.dll)

3. Add a the Master.xaml to the Resources folder (change assembly as appropriate);
<ResourceDictionary xmlns=”http://schemas.microsoft.com/winfx/2006/xaml/presentation&#8221;

xmlns:x="http://schemas.microsoft.com/winfx/2006/xaml"
xmlns:local="clr-namespace:ThemingSample"
xmlns:Pauliom="clr-namespace:Pauliom.Theming;assembly=Pauliom.Theming">
<ResourceDictionary.MergedDictionaries>
<Pauliom:ThemeResourceDictionary Kind="Theme"/>
</ResourceDictionary.MergedDictionaries>
</ResourceDictionary> 

4. The role of the Master is to provide a single place to create a master theme concept, you don’t need to use it so long are you put the ThemeResouceDictionary somewhere in your projects MergedDictionaries

5. Change App.xaml to make the resources available anyway in project, ensure the following in App.xaml, the first reference to Dark is your default, it helps the editors/designers;

<Application.Resources>
<ResourceDictionary>
<ResourceDictionary.MergedDictionaries>
<ResourceDictionary Source="Themes/Dark.xaml"/>
<ResourceDictionary Source="Resources/Master.xaml"/>
</ResourceDictionary.MergedDictionaries>  

6. That is all you need, you are now free to reference those resource keys in the knowledge the changes to the underlying theme will be automatically routed to your specific themed file

The Sample

I hope you find this as useful as I do, and I hope it encourages more applications to use and react to themes. You can find the source and components at https://winphonetheme.codeplex.com

How to transfer apps with Windows Phone 7 (wp7)

I was fortunate enough to get a second Windows Phone 7 today and naturally wanted to transfer all my hard-collected applications from the old wp7. I visited Zune expecting there to be some form of ‘restore applications’ button. Sure enough under purchase history it listed all my applications – happy days. However, when I selected an application it says to open MarketPlace. So I went to the new phone, opened MarketPlace and nothing. Hmm. I then visited www.windowsphone.com and looked at my phone->my account. There was the same list of applications, however this time there was a big fat ‘restore’ link. It then prompted to select a phone and one ‘restore’ later the application silently installed on the new phone. Hurray. I would say that the process could be a lot easier. A nice set of checkboxes rather than doing the painful task for each app would be nice Confused smile, and some sort of feedback on the phone to say it was installing would be useful too. But at least my paid for apps are back…or so I thought…

My phone operator is ‘Orange’ and they provide a nice add-on to MarketPlace called ‘Orange Selects’. It would seem that any application I’ve downloaded from there, free or otherwise, cannot be reinstalled – ‘sorry there is a problem’. Suffice to say I’m not very impressed, especially since I’m still using the same SIM and contract. So BEWARE.

EDIT: thanks to keyboardp for this; if you attempt to buy an app that you have previously purchased/installed then the marketplace will realise this and ask you if you just wish to reinstall it again. It’s a bit off putting to have to press ‘buy’ but it seems to install without incurring a payment.

Discovering what Data Item the control in your template is bound to

One issue that raises its head every now and again is how to add controls to a List’s Data Template in such a way that you can understand what data item the control is associated with when the control raises an event. E.g. I want to know what data item I should remove from a list when the user de-selects a checkbox;

<DataTemplate x:Key="MyDataClassItemTemplate">
    <StackPanel>
        <CheckBox IsChecked="{Binding IsSelected, Mode=TwoWay}" 
                    Content="{Binding DisplayName}" 
                    Unchecked="CheckBox_Unchecked"
                    />
    </StackPanel>
</DataTemplate>

As you can see the checkbox has an Unchecked event but when that fires you will only be told what specific instance of the checkbox raised the event, not what the associated data item is. Previously I have worked-around this issue using the Visual Tree but I’ve always hated that solution. So I’m now using the following code that relies on the fact that my control has some form of data binding;

private MyDataClass MyDataClassFromCheckBox(object sender)
{
    FrameworkElement fe = sender as FrameworkElement;
    BindingExpression be = fe.GetBindingExpression(CheckBox.IsCheckedProperty);
    MyDataClass selectedMyDataClass = be.DataItem as MyDataClass;
    return selectedMyDataClass;
}

There, a much nicer solution. Note the ‘IsCheckedProperty’, this would need to be changed depending upon the property you are using in the binding – it is easy to pass that in as a dependancy property argument. Another quick point, previously I’ve had a similar problem using a Button in a template. However, the button only had a fixed caption so there was no binding expression to use. One simple trick here is to create a fixed property in your view model and bind to that, e.g. myViewModel.ButtonCaption { get {return “My Button Caption” }}. Yes it’s a slight overhead but you may prefer that to using the visual tree, I do.

LongListSelector nullexception gotcha

Just had a little puzzler with my Windows Phone 7 application. My application uses the LongListSelector which is bound to a view model. However, if I launch a second page that will add extra data to the model and return back the LongListSelector kept throwing a nullexception error. It would appear the the LongSelector does not like receiving an OnPropertyChanged whilst on a page that is not currently showing. To workaround the problem I’ve had to expose a ‘Refresh’ method on my view model that the page invokes when it redisplays. I dare say it’s something I’ve not understood correctly about the page life cycle, so I thought I’d share it to a) help someone else with the same problem b) hope someone helps me with a better solution

How I think Silverlight can work on desktop & phone

I recently started to consider a new User Interface for a web application. Oh yes I want to use Silverlight but it just has zero presence on mobile devices, can I justify the speed in development/maintenance vs the lack of delivery channels. Hmm, I can try. But why should I? Windows Phone 7 (Wp7) runs Silverlight, that should certainly help me shouldn’t? But no, browse to my App on a browser on Wp7 and nothing, “no plugins here”. But why? The official line is about technical details, but I doubt that. Ok it’s not the same Silverlight but come on, it’s close enough to allow a desktop target of “restrict to Wp7 set”. So if not that then what else? Let’s imagine a world where Microsoft may pay some attention to Apple’s model. What if Microsoft can make money by only allowing apps on wp7 via a market place. Sounds like biz sense. But wait a second, if I browse to a site that has the same Silverlight app on it then why buy from the market place? Solution, stop Silverlight rendering on the browser. As I started this post, this frustrates me and stops me writing Silverlight apps for the web. But there is a way around this, “Wp7 enabled Silverlight app”. Imagine this;
1. In your Out Of Browser options you specify ‘Has Windows Phone 7 version’, and you enter the market place ID of your Wp7 application
2. You compile and deploy your Silverlight app
3. User browsers to your site via a desktop browser. They get the full experience
4. User browsers to your site from Wp7, the patched version of IE spots that the Silverlight host application has the market place id of a wp7 app. So it asks the shell’s catalogue if it has this ID, no – then prompt the user to purchase it, yes – launch the app and the user gets a specific phone experience. So there you have my idea of how we could get a shared experience, sure you’re still writing 2 apps, but now;
a) the site can have a functioning presence in a mobile browser
b) the wp7 has another selling channel, everyone’s a winner

Repost of Determine Light or Dark Theme with WP7 RTM

This is not my content but a repost from http://mobileworld.appamundi.com/blogs/peterfoot/archive/2010/09/17/determine-light-or-dark-theme-with-wp7-rtm.aspx , I just wanted to ensure I didn’t lose it

In the previous Beta release you had to compare the RGB values of the background brush to determine if the theme was Light (White background) or Dark (Black background). Now there is an additional resource you can query:-

Visibility v = (Visibility)Resources["PhoneLightThemeVisibility"];
 
if (v == System.Windows.Visibility.Visible)
{
    ImageBrush ib = new ImageBrush();
    Uri u = new Uri("PanoramaBack2.png", UriKind.Relative);
    ib.ImageSource = new System.Windows.Media.Imaging.BitmapImage(u);
    PanoramaControl.Background = ib;
}

Any time you use a background image you can check the PhoneLightThemeVisibility resource and switch between different versions of the image to provide the best experience with either Black or White text.