A couple of issues porting from Monotouch to WP7

One of the major benefits to me of both Windows Phone 7 (WP7) and Monotouch is that I can write in .net. So although the visual-view side of coding for both is very different I should be able to use pretty much the same model & services right? Well sort of. Here are a couple of issues I’ve hit during a recent port;

Database

I was quite surprised by this one. Monotouch, as does .net, has a number of database options but I guess a very common choice is mySQL. As such my persistence layer makes heavy use of SQL. However, currently there isn’t an implementation of mySQL available on WP7. I’m guessing it’s to do with only having the isolation storage stream available. I am aware of a some alternatives, Silverlight Database & Perst to name a couple, and I’ll certainly be taking a look at these in the future. However, for my little project I’m not storing a great amount of data so I’ve stuck with simple serialization techniques and a hefty use of Linq for now. 

Reduced function set

One of the more interesting problems was hitting those functions that are “unavailable” in Silverlight but free to roam in Monotouch. My main example of this is XDocument.Load. My application makes use of a xml based web service to retrieve information for the user and as with most applications I need avoid using the UI thread to run this requests. The pattern I’d used for Monotouch was aimed a KISS since in my experience 2 of every 3 errors you get provide little or no clue as to what is actually causing the problem. So the idea is for the UI to make a single asynchronous call to the service and for that to make sequential calls to the underlying web service. Sure the overall time will be longer but the complexity is low;

image

The code I used to make the synchronous web service call was XDocument.Load.  My original intention was to directly port the service code to WP7, this is where I hit this reduced function set problem in Silverlight. Silverlight does not allow XDocument.Load to go outside of the current XAP. What I’m supposed to do is make async calls to the web service via WebClient, well done Silverlight you’re forcing me to code properly. However, the code complexity has now risen because I now have to handle a number of events to satisfy the requirements;

image

So I now have the added complexity of gathering the async results from both service layers. Ok it’s not a bad thing to do but it does show that, rightly or wrongly, I have more flexibility to design (incorrectly?) a solution in Monotouch than I do in Silverlight. Although it also shows that I’m far more confident in getting sensible errors back in Silverlight, and for people that are only familiar with Silverlight I’ll let you draw your own conclusions about the quality of errors in Monotouch.

Diagnostic Output

One irritating problem was Console.Write et al do not seem to produce any output to Visual Studio for WP7. Hopefully this is either something I’ve missed or a feature that will be there once out of Beta. I switched to System.Diagnostics.Debug instead.

Summary

This wasn’t intended as an in-depth study of porting between the two but simply to show that if you take a moment to spot where the differences are and investigate appropriate abstractions and patterns then you can save yourself a lot of time.

Changing the Accessory icon of a Table View

Whilst designing an iPhone application I wanted to have a very dark background colour for my Table View. I also wanted to use the standard UITableViewCellAccessory.DisclosureIndicator. However the default colour of the indicator is dark and doesn’t show up against a dark background. So I’ll just change the colour? Unfortunatley there is very little exposed to allow you to customise it, so I thought I’d blog a very quick way to make such a change;

In your table view controller override the GetCell function, this is typically a required step if you want to display data. Now you must create your own AccessoryView, this can be a complicated view, but for now let’s start with the most basic form;

RectangleF accessoryRectangle = new RectangleF(1f,1f,40f,25f);
UIView cellView = new UIView(accessoryRectangle);
cellView.BackgroundColor = new UIColor(0f,1f,0f,1f);
cell.AccessoryView = cellView;

so we now have a lovely green square, very professional. To prove you can use other assets, and to do something slighlty more useful, just use a label;

UILabel label = new UILabel(accessoryRectangle);
label.Text = ">";
cell.AccessoryView = label;

there you go, hopefully you can see that you could create as complicated a view as you want.

Using Sketchflow to prototype MonoTouch application

I wanted to see how tricky it would be to use Sketchflow to prototype a iPhone application. I think it’s worthy of a proper tutorial but for now I’ll give a quick pass since 1/2 the battle is just knowing it’s possible.

The first thing I needed was a template for an iPhone, I found one I liked at http://anoriginalidea.wordpress.com/category/sketchflow/. I made this into a User Control and then into a Screen Component (all via single right-clicks). With a couple of grids you can create the basic table view controller layout. Running with the seemingly accepted mono touch community theme of football RSS feeds I created the layout you see below. What you can see is the iPhone control as the background, a simple textbox for the view title, a databound list box pretending to be a table view controller and a stack panel of buttons playing the role of tab controller.

imageimageimage

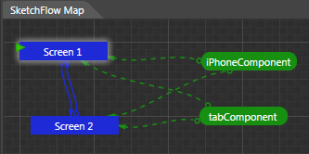
One of the important aspects of using SketchFlow is to create the navigation and state changes to allow your customers to see what is likely to happen. In my example (forgive the names) I’ve created Screen 1 (the table navigation view) which links to Screen 2 (the detail view). Looking at the screenshots does usually help but with the additional SketchFlow map you can see that there are blue navigation flows between the two. You can also see that I’m reusing two assets on both screens, namely the iPhone and tab components.

So I’ve created a design in SketchFlow, now what? How do I get feedback on this, how do I pass this onto to designers and developers? One way is to use the Export to Word option that creates a nice document for people to get their red pens out and dual over.

image

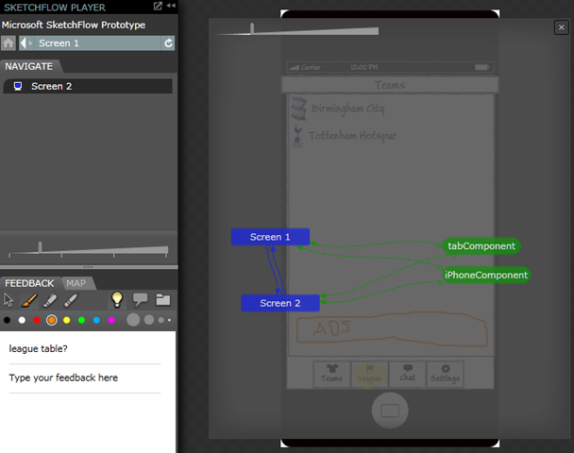
But this is all very stale, the real advantage is to create an interactive player that you can send out to your customers (WPF) or host on a web site (Silverlight). This allows for annotations & graphical feedback together with a simple way to navigate between the screens and states.

image 

However, with the use of a few behaviours you can get the buttons and UI to execute the transitions by pressing them, far more intuitive and with little effort. I can’t really show that here, trust me the buttons highlight and and click through…

image

If there is enough interest I’ll write a tutorial and publish the source, but hopefully there is enough here to pique someone’s interest in using SketchFlow with MonoTouch. Now if MonoTouch represented the UI as XAML…

Creating a very simple MonoTouch application without the Interface Builder

Creating a very simple MonoTouch application without the Interface Builder

I admit that I’m not a big fan of the Interface Builder (IB). I find that it either hides what I need to know or fails to help me implement what I what via a GUI. So I’ve decided to take a leaf from Craig Dunn (http://conceptdev.blogspot.com/search/label/monotouch) and avoid some of the hidden magic from IB and manually build some of the controls. However, there isn’t an empty iPhone project so I thought I’d write a quick blog to help me remember what I need to do.

Create a new project

First off create a new project, this will generate the usual set of files, so the next step is to get rid of those of IB files
image

Clean the project

Delete MainWindow.xib

image

Add AppDelegate.cs

I like Craig’s clean solution, so do as the man says and add a new class (File->New) AppDelegate

image

and add the following code snippet;
using System;
using MonoTouch.Foundation;
using MonoTouch.UIKit;

namespace UIWithoutIB
{

    [Register ("AppDelegate")]
    public class AppDelegate : UIApplicationDelegate
    {
        UIWindow window;
     public override bool FinishedLaunching (UIApplication app, NSDictionary options)
        {
            // Create the main window and add the navigation controller as a subview
            window = new UIWindow (UIScreen.MainScreen.Bounds);
            window.MakeKeyAndVisible ();
            return true;
        }
        // This method is allegedly required in iPhoneOS 3.0
        public override void OnActivated (UIApplication application)
        {
        }
    }
}

Change Main to use only AppDelegate.cs

Remove the partial class used to implement the Application Delegate from Main.cs. Main should look like;
using System;
using MonoTouch.Foundation;
using MonoTouch.UIKit;

namespace UIWithoutIB
{
    public class Application
    {
        static void Main (string[] args)
        {
            // UIApplication.Main (args); See blog comments from Philippe Laybaert….

            UIApplication.Main (args,null,"AppDelegate");

        }
    }
}

Prevent, Failed to load NSMainNibFile MainWindow

Ok so we’re in the land of Cocoa and we should play nice and say what our Main Window is. But hey I don’t want to, so if you build now you’ll get a strange message, ‘Failed to load NSMainNibFile MainWindow’. The template did a good job and created a MainWindow and filled in some extra “project” details. Since we no longer have MainWindow we should correct this. So make sure you have set your display options to Show all files, and navigate down the bin folders to the info.plist file. Open that and delete the ‘Main nib file base name’ setting.

image

Load our views

Change the App Delegate to add our views (and controller), or in this case a label control. Change the FinishedLaunching override to;
public override bool FinishedLaunching (UIApplication app, NSDictionary options)
        {   
            // Create the main window and add the navigation controller as a subview
            window = new UIWindow (UIScreen.MainScreen.Bounds);
         UILabel purpleLabel = new UILabel();
         purpleLabel.BackgroundColor = UIColor.Purple;
         purpleLabel.Text = "Hello none IB World";
         purpleLabel.Frame = window.Frame;
         window.AddSubview(purpleLabel);
            window.MakeKeyAndVisible ();
            return true;
        }

Run the app

imageSo from here we can add other view-controllers without having to use IB. Having said that, I still use IB to create the odd view, and you can still use those controllers with this method.
A quick note about troubleshooting, I’ve found that if you’ve built with a IB file (xib) you later delete it’s worth asking for a Build->Clean, Build->Rebuild.

How to: Use different views with a PageControl in MonoTouch

I’ve just started down the rocky road of iPhone development via MonoTouch. I suspect like many .net developers I’ve found the iPhone thang can be downright weird. One of the bloggers I’ve found helpful is Simon Says. One such post explains how to create a PageControl, http://simon.nureality.ca/?p=135. You know, that series of dots at the bottom of an iPhone view that allows you to move between pages of information. Although the post is great one thing still puzzled me, how do I shows pages of different views, i.e. if this was WinForms how would I can create different forms (Views) and show them as different pages? So first off, follow Simon’s post and get to the point where you should now have 10 pages each showing a label then;

NB. I’m no expert at this, if you know a better way to do something (or just spot a mistake) please let me know.

1. How do I get the PageControl to move between the pages?

Simon’s post allows you to ‘flick’ your way through the views and the PageControl reflects the changes, however if the user flicks the PageControl nothing happens.

In CreatePanel add the following event handler;

pageControl.TouchUpInside += HandlePageControlTouchUpInside;

void HandlePageControlTouchUpInside (object sender, EventArgs e)
        {
            // big assumption: the user moves the page control and after the control has set the current page this event is fired
            RectangleF toRect = new RectangleF(scrollView.Frame.Width * pageControl.CurrentPage, scrollView.Frame.Y, scrollView.Frame.Width, scrollView.Frame.Height);
            scrollView.ScrollRectToVisible(toRect, true);       
        }

2. Having 10 repeated Labels as Views is nice, but how do I use a mixture of my views I’ve created in the Interface Builder?

I recommend that for every different Form/View you want to display create a ViewController via File->New File->View with Definition Controller. In my example I created a controller called BertController.

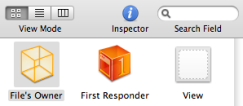
Open the xib file in the Interface Builder (IB). You can drop whatever UI widgets onto the View, but for now let’s start by dropping a UILabel. In the weird world of imageiPhone development you need to create field to represent the UI element by creating an outlet, so in the Library viewer make sure the class representing the controller is selected (in my case BertController) and select the outlet tab. Create a new outlet to represent the label called, myLabel (or a much better name). Make sure the File Owner is selected and view the connection inspector’s outlet tab. Drag the name of you outlet to the label control. I know, it’s weird but you get used to it (so they tell me). Save and quit IB. Now we have something much more like our familiar forms class. So let’s expose the label control to the outside world (yes it’s bad practice but hey it wouldn’t be a tutorial without it). Open your controllers cs file (BertController.xib.cs) and add a property to it;


public UILabel MyLabel {
            get
            {
                return this.myLabel;   
            }
        }

See just like a normal form 😉

Now we have a view controller like our beloved form class we need to add it to the pages. Revisit CreatePanels in main and comment out all the for-loop and add the following function;

void AddView (string label)
        {
            RectangleF lastFrame = scrollView.Frame;
            PointF lastLocation = new PointF();
            lastLocation.X = lastFrame.Width * scrollView.Subviews.Count();
            lastFrame.Location = lastLocation;
            BertController controller = new BertController();
            controller.View.Frame = lastFrame;
            controller.MyLabel.Text = label;
            scrollView.AddSubview(controller.View);
        }

Pages on the iPhone are a series of frame-sized ‘views’. So to create them you need to know where in the virtual frame-set to add them. I think I’ve got the maths right, so if you use the function it should append a new BertController to the set. So add the following to CreatePanels;

AddView ("Well hello there 1");
AddView ("Well hello there 2");

imageThere you have it, two of our views/forms all handled by the PageControl. So if you wanted to add different Forms create a new View Controller and add the controllers view. Hope it helps.